
When the Vintage Wings Tiger Moth was rebuilt by the previous owner, his intention was to fly it across Canada upon completion. Therefore an auxiliary fuel tank with a capacity of 10 Imperial gallons was installed at the very front of the forward cockpit (it is a de Havilland part number) along with a wind-driven generator. This is in addition to the 19 Imperial Gallon fuel tank located as part of the upper wing. A fuel line runs from the aux tank, to the aft cockpit where a hand pump from what is believed to be a Cessna Crane is operated by the pilot to transfer the aux fuel to the Main Fuel Tank which then gravity feeds the engine. What is known as a Limited Supplemental Type Certificate has been issued for the hand pump installation.
This year, it was noticed that the hand pump was not working well, so it was decided to make a repair. While being installed, a sharp-eyed AME noticed an indication of corrosion on the metal airframe. Rust on the interior of on of the tubes had corroded right through and left a small mark on the fabric. Closer examination by our structural engineer using a punch on various locations of the frame revealed several locations of weakness. Not good news. In fact it cancelled plans for it to participate in the Ontario portion of the Yellow Wings tour. This was unfortunate as the Tiger Moth made up one of the largest fleets (no pun intended) of elementary trainers in the BCATP. In fact there were many more Tiger Moths flying in Canada than Finches. After all, the British were paying for half of the Gipsy Major engines that were being shipped here from the U.K. while the Kinner engines for the Finch were fully funded by Canada.
Therefore, the airplane has been stripped to its bare bones with rusted pipe cut out and new tubing welded into place. The aircraft is now being put back together and will be airworthy in early 2012.

The Tiger Moth being stripped down to its bare bones. Notice the silver 10 imperial gallon aux fuel tank. Two fuel lines can be seen on the starboard side. One directs fuel to the handpump in the rear cockpit which is then pumped forward and straight up to the main tank in the second line. The aux tank filler cap can be seen above the venturi. Just beside the aux fuel tank is the step used to climb up onto the cowl for refuelling the wing tank. As well, the wind-driven generator modification can be seen on the forward belly. It starts generating power when the propeller is above 1200 rpm(or any time in flight). The upper wing with its nav light can be seen in the background.

Some of the corroded tubing and gusset plates are seen here. Apparently, oil was not put into Tiger Moth tubing at the various factories. The history of this airframe for several decades after the war is unknown.


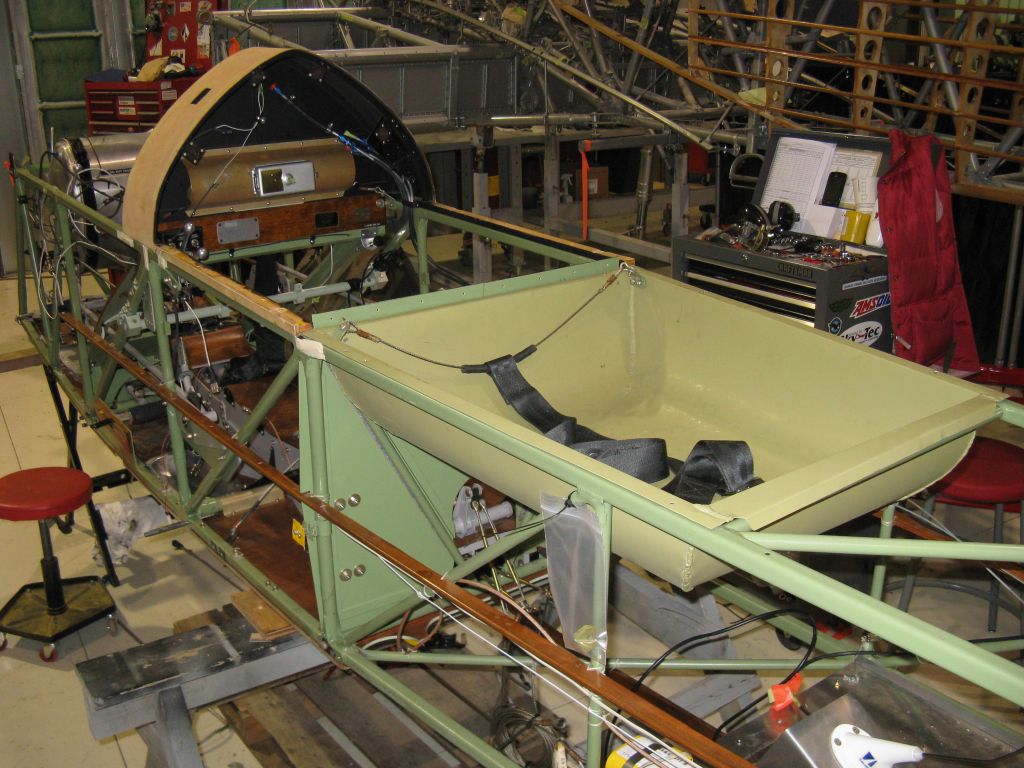
Completely stripped down, you can easily see the baggage compartment tray and the shoulder harness attachment just behind the aft cockpit. Note the pointed instrument(less) panel at the forward part of the rear cockpit. Tiger Moths built in other countries had a larger, rounded panel. The smaller(North American) instruments of the DH.82C allowed this slightly smaller panel giving the instructor a better view of the student.

A nice view of the cables and pulleys of the brake system that only Canadian built DH82C Tiger Moths were fortunate enough to be manufactured with. The rudder bar is plainly visible and shows how the forward occupants feet are right under the aux fuel tank. The aux fuel tank(with drain line below it), fuel handpump and wind-driven generator were installed several years ago by the previous owner with aspirations of a cross-Canada adventure. Those with shorter legs who want to fly a Tiger Moth can relax. The little black circular things forward of each rudder pedal are attached to a pin. When pulled out, the rudder pedals can be adjusted. It is not easy to do once the aircraft is put back together.

Two of the many welded repairs that were made on the airframe can be seen here after being painted over. In this section, new tubing runs from the welded-on outside sleeve on the angled tube down to the black lower wing fitting. Then a separate piece of new tubing goes vertically to halfway inside the other outside sleeve. In the lower left background can be seen the attach fitting to the floor for the rear lap belt. On the lower right, the silver area is a metal well fitted into a floor cutout for the pilots heel and higher up, the silver trim handle.
No comments:
Post a Comment